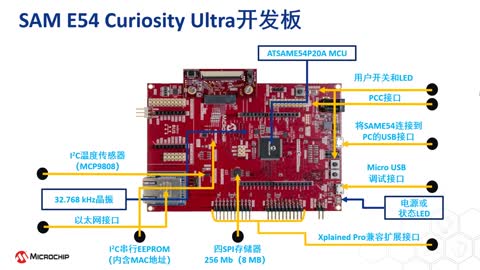
|
���ęn��B������ĺͿ��� S5M8767���� camera �Uչ���ӵ� VDD28_AF��VDD28_CAM �����������w��B�(q��)������Ό��F(xi��n)�Դ�ĺͿ��ơ� ����߀��һ���ęn��iTOP-4412-�(q��)��-�Դ����оƬ��ݔ��늉������Ñ������ڼ��g(sh��)֧��Ⱥ���ѵ��������漰�����w�Y(ji��)��(g��u)�ķ�����Ҳ���Ѕ����rֵ�� ���ęn�Ծ��w���(q��)��С���̽�B���ѽ�(j��ng)���úõ�Դ�a�����ģ��Ñ����Ԍ��伯�ɵ��Լ����(q��)���У�Ҳ�ṩ���(q��)�Ӝyԇ?y��n)��̉��s����power_s5m8767a.tar.gz���� 1. Ӳ������ 1.1 ԭ��D���� ���D��ʾ���ڵװ�ԭ��D���ҵ� camera �Uչ���ӣ��@���� VDD28_AF��VDD28_CAM ������camera �z���^�(q��)������Ҫ�����O(sh��)�Þ� 2.8v ��늉��������҂������Ğ� 3.3v ݔ������Ҫȥ�� camera �z���^�(q��)�ӣ��� 
���D��ʾ�����İ�ԭ��D�������W(w��ng)�j(lu��)��VDD28_AF���͡�VDD28_CAM�������Կ�����VDD28_AF���͡�VDD28_CAM���քe����(y��ng)�ԴоƬ S5M8767A �ġ�VLDO20���͡�VLDO21����
1.2 �ԴоƬ S5M8767A �� datasheet ���� S5M8767A �� datasheet �� 2.3.1 С��(ji��)�����D��ʾ��
���ψD��ʾ��ע��t���еă�(n��i)�ݡ�������ļt���У���ʾݔ��������� 150mA�����ݔ��늉��� 0.8v�����늉��� 3.95v������t���У���B����Ĭ�J(r��n)ݔ��늉������Կ��� LDO20�� LDO21��Ĭ�J(r��n)ݔ������ 3.0v�� 2. ܛ�� ���Ҫ��׃ݔ��늉�������ͨ�^��ƽ�_�ļ����F(xi��n)�����(q��)���У�����ͨ�^����(sh��)�{(di��o)�ã������Դݔ���� ͨ�^ǰ��ķ�����֪��ldo21 �� ldo20 ݔ����������� 0.8v �� 3.95v�� 2.1 ƽ�_�ļ���ݔ��늉� �ڃ�(n��i)�˵ġ�arch/arm/mach-exynos/mach-itop4412.c���ļ��У����D��ʾ�M���ġ�
��REGULATOR_INIT(ldo20, "VDD28_CAM", 2800000, 2800000, 0,REGULATOR_CHANGE_STATUS, 1); עጵ����Ğ� 2800000,�� 3950000������(sh��) REGULATOR_INIT �еĵ�һ������(sh��)��ʾ8767 �ԴоƬ�ĵ� 20 ·������������(sh��)��ʾݔ�����늉������Ă�����(sh��)��ʾݔ�����늉������@���O(sh��)�Þ���ͺ����ȫ���� 3.95v��ͬ�����҂����� 21 ·Ҳ�Ğ� 3950000�����ψD��ʾ�� ������ menuconfig �У��� ov5640 �z���^���(q��)��ȥ��������ڔz���^�Е���ʼ�������á�ov5640 �z���^�z���^������·�����D��ʾ������؈D���ѽ�(j��ng)ȥ���Ľ؈D��Ĭ�J(r��n)ȱʡ�ļ��������ϵġ�
2.2 �(q��)������ �(q��)�����̡�power_s5m8767a.tar.gz�����ęn��ͬһ���s���С� ����һ�����ε��(q��)�Ӝyԇ����Դ�a������ʾ�� #include #include #include #include #include #include #include #include #include #include #include #include struct regulator *ov_vddaf_cam_regulator = NULL; struct regulator *ov_vdd5m_cam_regulator = NULL; struct regulator *ov_vdd18_cam_regulator = NULL; struct regulator *ov_vdd28_cam_regulator = NULL; MODULE_LICENSE("Dual BSD/GPL"); MODULE_AUTHOR("iTOPEET_dz"); static int power(int flag) { if(1 == flag){ regulator_enable(ov_vdd18_cam_regulator); udelay(10); regulator_enable(ov_vdd28_cam_regulator); udelay(10); regulator_enable(ov_vdd5m_cam_regulator); //DOVDD DVDD 1.8v udelay(10); regulator_enable(ov_vddaf_cam_regulator); //AVDD 2.8v udelay(10); } else if(0 == flag){ regulator_disable(ov_vdd18_cam_regulator); udelay(10); regulator_disable(ov_vdd28_cam_regulator); udelay(10); regulator_disable(ov_vdd5m_cam_regulator); udelay(10); regulator_disable(ov_vddaf_cam_regulator); udelay(10); } return 0 ; } static void power_init(void) { int ret; ov_vdd18_cam_regulator = regulator_get(NULL, "vdd18_cam"); if (IS_ERR(ov_vdd18_cam_regulator)) { printk("%s: failed to get %s\n", __func__, "vdd18_cam"); ret = -ENODEV; goto err_regulator; } ov_vdd28_cam_regulator = regulator_get(NULL, "vdda28_2m"); if (IS_ERR(ov_vdd28_cam_regulator)) { printk("%s: failed to get %s\n", __func__, "vdda28_2m"); ret = -ENODEV; goto err_regulator; } ov_vddaf_cam_regulator = regulator_get(NULL, "vdd28_af"); if (IS_ERR(ov_vddaf_cam_regulator)) { printk("%s: failed to get %s\n", __func__, "vdd28_af"); ret = -ENODEV; goto err_regulator; } ov_vdd5m_cam_regulator = regulator_get(NULL, "vdd28_cam"); if (IS_ERR(ov_vdd5m_cam_regulator)) { printk("%s: failed to get %s\n", __func__, "vdd28_cam"); ret = -ENODEV; goto err_regulator; } err_regulator: regulator_put(ov_vddaf_cam_regulator); regulator_put(ov_vdd5m_cam_regulator); regulator_put(ov_vdd18_cam_regulator); regulator_put(ov_vdd28_cam_regulator); } static int hello_init(void) { power_init(); power(1); printk(KERN_EMERG "Hello World enter!\n"); return 0; } static void hello_exit(void) { power(0); printk(KERN_EMERG "Hello world exit!\n"); } module_init(hello_init); module_exit(hello_exit); Makefile ������ʾ�� #!/bin/bash obj-m += power_s5m8767a_test.o KDIR := /home/topeet/android4.0/iTop4412_Kernel_3.0 PWD ?= $(shell pwd) all: make -C $(KDIR) M=$(PWD) modules clean: rm -rf *.o modules.order *.ko *mod.c Module.symvers ʹ�� make ����g�(q��)��ģ�K�����D��ʾ��
3. �yԇ ���D��ʾ�����d�(q��)��֮�y��늉���s�� 2.85 ���ң��Љ�������ж�d�(q��)��֮��� ���� 0���f���(q��)���\�гɹ����Ñ����Լ����Ŀ�У�������Ҫ�õ��Դ���ƣ����ԅ��������� �팍�F(xi��n)��
���ڳ��W(xu��)�߁��f���x��һ����m���_�l(f��)��dz���Ҫ�� Ѹ��o�������_�ČW(xu��)��(x��)·�������ȣ�����Ҫ���xһ���@��ҕ�l�̳̣� Ƕ��ʽ�W(xu��)��(x��)����ƪ��https://www.bilibili.com/video/BV1HE411w7by?p=1 Ȼ����Ҫ�W(xu��)��(x��)һ��Linux��ϵ�y(t��ng)��ܣ� https://www.bilibili.com/video/BV1HE411w7by?p=2 ����������һЩ���`�ˣ����美�gϵ�y(t��ng)�İ��b�����g�Լ��������@Щ������Ѹ���ҕ�l�̳́�W(xu��)��(x��)��Ҳ���ԅ������_(d��)2300퓵��Ñ�ʹ���փԡ� ���Tƪ��https://www.bilibili.com/video/B ... 7086078002054549963 ���⣬Ѹ���ṩ�ˏV��ٝ�u��QT���T�̳̣� QT�W(xu��)��(x��)ƪ��https://www.bilibili.com/video/B ... 7086078002054549963 �������ԌW(xu��)��(x��)һ���(q��)�����P(gu��n)���g(sh��)�� Linux�(q��)�ӌ��}��https://www.bilibili.com/video/B ... 2661886997282795316 �������Ƿdz��ӵؚ�Č���(zh��n)�̳̣� �C܇��(d��o)���Ŀ��https://www.bilibili.com/video/B ... 7086078002054549963 �Ʒ���(w��)�����ܼҾӣ�https://www.bilibili.com/video/B ... 7086078002054549963 ���@�ӵ�·���D�W(xu��)������Ѹ�鏊���ۺ�Ď����£�������ܿ����Ƕ��ʽ�_�l(f��)�Ĵ��T�� |