
步驟二
打開一個終端,訂閱主題���,命令如下:
mosquitto_sub -h localhost -t "mqtt" -v
其中參數-h 是指定要連接的 MQTT 服務器�,這里使用的是本機,也可以直接使用本機的 IP����,-t 訂閱主題����,此處為 mqtt����,所以主題為 mqtt,-v 打印更多的調試信息����。
如下圖所示:

步驟三
打開另一個終端�����,(注意這里我們又新打開了一個終端)發布主題,命令如下:
mosquitto_pub -h localhost -t "mqtt" -m "Hello MQTT"
其中參數-h 是指定要連接的 MQTT 服務器���,這里連接的是本機,所以是 localhost��,也
可以是要連接的設備的 IP 地址�,-t 訂閱主題,此處為 mqtt��,-m 指定消息內容���,這里發送的是 Hello MQTT。
如下圖所示:

發送成功以后�,mqtt 的訂閱端會收到我們的發布的信息 Hello MQTT���,如下圖所示:

三.移植 mosquitto 到開發板
mqtt 源碼下載頁:
https://mosquitto.org/files/source/
Mosquitto 庫依賴 libuuid 和 openssl 庫��,所以我們在交叉編譯 Mosquitto 之前需要先交叉編譯他所需要的依賴庫�,這里作者已經把需要的源碼都下載好了,大家可以在這個文檔的目錄下找到���。不建議大家下載和我不一致的版本,可能會出問題�。
1. 交叉編譯 uuid 庫
我們把 uuid 的源碼拷貝到 Ubuntu�����,作者是拷貝拷貝到了/home/topeet/mqtt 下面,如下圖所示:

輸入以下命令����,解壓源碼并進入解壓生成的文件夾:
tar -vxf libuuid-1.0.3.tar.gz
如下圖所示:

然后我們在/opt/下創建一個名為 mosquitto-arm 的文件夾��,命令如下:
mkdir -p /opt/mosquitto-arm
如下圖所示:

配置源碼,我們在解壓生成的 uuid 庫的文件夾輸入以下命令:
./configure --prefix=/opt/mosquitto-arm/libuuid-1.0.3 CC=arm-none-linux-gnueabi-gcc --host=arm-linux
如下圖所示:

最后���,編譯并安裝,命令如下:
make
make install
編譯并安裝成功后會在我們設置/opt/mosquitto-arm 下得到一個 libuuid 的文件夾

2. 交叉編譯 openssl 庫
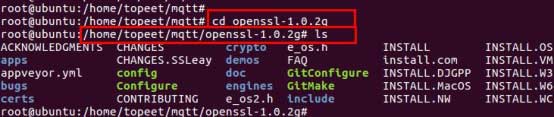
解壓壓縮包進進入解壓后的目錄
tar -vxf openssl-1.0.2g.tar.gz cd openssl-1.0.2g
如下圖所示�����。作者是放在了/home/topeet/mqtt 目錄下
配置編譯參數
setarch i386 ./config no-asm shared --prefix=/opt/mosquitto-arm/openssl/
setarch i386:聲明生成的是 32 位 CPU��,如果是 64 位 CPU 則去除該部分
--prefix :指定 make install 后生成目錄的路徑�����,不修改此項則默認為 OPENSSLDIR
目錄(/usr/local/ssl)。
shared :生成動態連接庫�����。
no-asm: 是在交叉編譯過程中不使用匯編代碼代碼加速編譯過程��,原因是它的匯編代碼是對 arm 格式不支持的
如果 Makefile 中有 -m32 和-m64 就刪掉 -m32 和-m64���,但是我的 Makefile 中沒有,就沒管這個�。
如下圖所示:

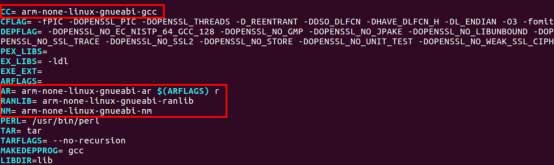
修改 openss 文件夾下的 Makefile 里面的編譯器參數如下
CC= arm-none-linux-gnueabi-gcc
AR= arm-none-linux-gnueabi-ar $(ARFLAGS) r
RANLIB= arm-none-linux-gnueabi-ranlib
NM= arm-none-linux-gnueabi-nm
如下圖所示:
編譯并安裝
make
make install
編譯并安裝成功后會在我們設置/opt/mosquitto-arm 下得到一個 openssl 的文件夾

3.交叉編譯 mosquitto
解壓壓縮包進進入解壓后的目錄
tar -vxf mosquitto-1.5.tar.gz cd mosquitto-1.5
如下圖所示��。作者是放在了/home/topeet/mqtt 目錄下

編譯源碼
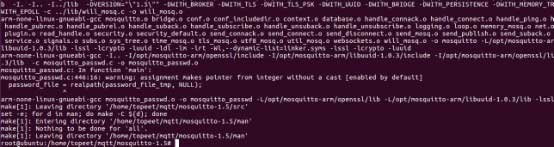
make WITH_SRV=no CC=arm-none-linux-gnueabi-gcc CXX=arm-none-linux-gnueabi-g++
CFLAGS="-I /opt/mosquitto-arm/openssl/include -I /opt/mosquitto-arm/libuuid-1.0.3/include -I/opt/mosquitto-arm/openssl/lib -I /opt/mosquit/to-arm/libuuid-1.0.3/lib" LDFLAGS="-L
/opt/mosquitto-arm/openssl/lib -L /opt/mosquitto-arm/libuuid-1.0.3/lib -lssl -lcrypto -luuid"
注意,如果大家這里安裝 uuid 和 openssl 的庫的時候路徑和我的不一致����,要把-I 和-L 指
定的庫和頭文件的路徑修改成自己對應安裝 uuid 和 openssl 庫的路徑�,否則編譯不過去����。
如下圖所示:

編譯成功如下圖所示:
安裝,命令如下
make DESTDIR=/opt/mosquitto-arm/mosquitto-1.5 install
編譯并安裝成功后會在我們設置/opt/mosquitto-arm 下得到一個 mosquitto-1.5 的文件夾

至此,我們 mosquitto 就已經交叉編譯完成了
文章未完請關注:iTOP-4412開發板-mqtt移植教程(二)


